
Laser Cut Terrain
The NOVA ordered several pieces of terrain from Miniature Scenery, as mentioned
previously in Part 2. The pieces all look great, though there were a few
concerns. I assembled the Elven Tower (all by myself, thank you) and the
Modulators. My Wife did most of the other pieces, with one being a joint
effort. We found that only one of the pieces had really good instructions
online for how to assemble. This didn’t stop my Wife (the puzzle master), but
it sure did frustrate her. Also, there were several instances of the pieces not
lining up right or not having holes cut out in the right places. Now, I’m
willing to admit that there may have been nothing wrong with the terrain and it
was user/assembly error. But in that case, we’re back to the poor instructions.
J

I did the Modulators first. They were pretty simple.

The Dias, which sits on top of the hills, was also simple
and we got around the issues with it fairly easily.
 |
| The Dias could double as an Eldar Landing pad |
The Tower was a fright, but I persevered (and impressed
the heck out of my Wife!)
 |
| Tower on the left and Dias on the right ready for assembly |
 |
| Tower- We learned to pre prime before assembly to get maximum coverage |
 |
| Black Then Brown |
 |
| Finished tower just left of center |
There were two Elven Walkways. These gave the Wife the
most trouble for assembly. Finally, she threw up her hands and said we should
just use the stairs and ditch the walkway parts. Working together, we came up
with the idea of making a circle to enclose the statue that I picked up through
Amazon.
 |
| Walkway parts |
 |
| The Ring of Tears |
 |
| With Statue |


The last terrain feature assembled was the Sanctuary of
Souls, which was time consuming more than anything else. Lots of little pieces
and my Wife was worried that they wouldn’t sit properly if she made a mistake
in gluing them together. But I think it looks great!
 |
| Under construction |
 |
| Defense gun Being painted |
 |
| Sanctuary of Souls completed barrier |
Due to our efforts with the NOVA, my Wife and I have worked
with this kind of terrain from many different companies. She was impressed with
how well the perforations were done. There was almost no need to cut the pieces
out, which she appreciates, since she once sliced her thumb open with a hobby
knife while doing so. (Different company’s terrain) The poor instructions are
par for the course, though that’s no excuse for them. The thing that really
dragged down their score in our book was the pieces that didn’t fit together
because cuts hadn’t been made in the right places. That’s just sloppy design.
Still, we were able to get around it and you can’t tell to look at the final
product. Overall, we’d rate this terrain four out of five stars.
Here are some pictures of the assembled laser cut terrain
Here are some pictures of the assembled laser cut terrain
 |
| L to R- Dias, Space Modulators, Tower |
 |
| Dias, Ring of Tears, Tower. (Prototype in the background) |
 |
| Dias, Ring of Tears, Tower, Hill Stairs |
Building The Hill
After the design and layout for the table was well
underway it was time to get started on the quite large hill that was mentioned
in the last post. The basic Hill design is a quarter circle (roughly 18” radius)
with a second, slightly smaller (15”) quarter circle on top of it. It is
designed to fit in the outer corner of Tile 1.
In Part 2, I described how my Wife used a measuring tape
compass to mark out the area that the hills would take up on Tile 1.
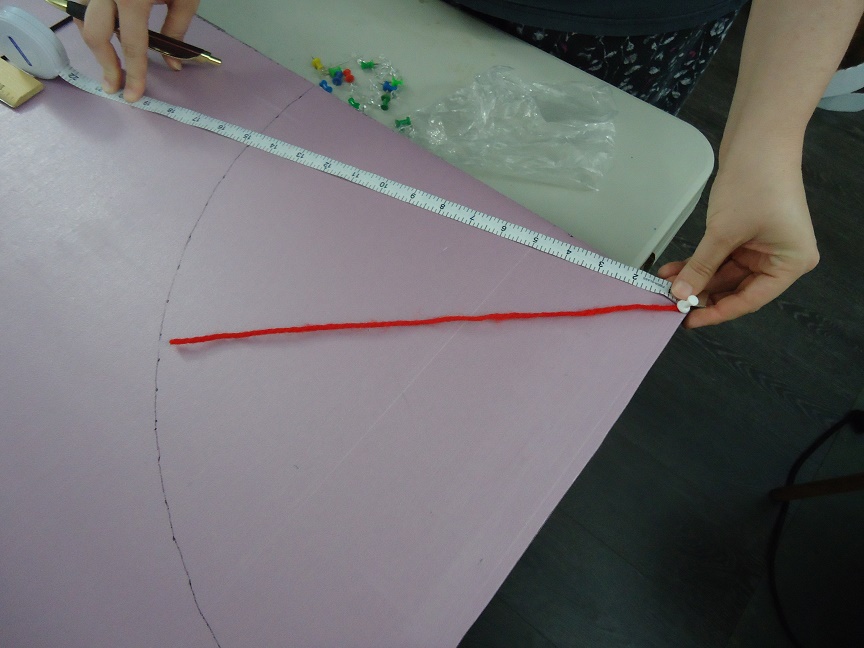 |
| Remember this? |
She did the same thing with two more pieces of 2” pink
foam and then used a foam cutter to cut out the hills. I didn’t think that
would work very well, because the 2’ x 2’ sections of foam were too big to fit
on the cutter, but she insisted it would work. Every time she got to the point
where the foam wouldn’t go any farther (because the arm of the cutter was in
the way), she just stopped following the curve of the hill and cut a straight
line towards the edge of the foam. Then she moved to the other side of the foam
square and followed the curve from there.
She knew the pieces would be too unwieldy for detail work
until she’d cut them down, so she stayed an inch or so away from her guide line
on the first pass. Then she came in close and did her best to cut right on the
line she’d marked out. Because of this, she ended up with several long curved
pieces of foam. I can definitely see myself using the other blocks of foam she
had left over, but I didn’t know what I’d do with the curves. My Wife, however,
had no trouble coming up with a use for them.
 |
| Rarrrrrrrrr! |
 |
| My Claws is bigger than yours! |
After the basic shapes were cut out I glued the 2 parts
together with Wood Glue. Remember to score the foam before applying the glue,
as this will give a better bond. I used heavy books to hold it down.
 |
| Finally found a use for those 8th ed books! |
Now the hill was ready for shaping.
 |
| Notice the random blue lines |
Using the same grade of sand paper as I did for the rest
of the table, I sanded the vertical surfaces and rounded off the top edges to
give the hill an artificial look. I put
some of the assembled laser cut terrain on the table to see how it was coming
along.


 |
| Hey! Stop trying to read my email! |


Next, I took the wire cutter and added some Eldar style
lines using a French curve template. (Remember the blue lines?) After that, I
took spackle to it and fixed the blemishes as best I could. Lastly, I added a
bead of Spackle where the two parts join to seal it up. A little sanding later
and it was good to go.

After that, it was a wash of watered down wood glue then
on to painting. (Coming soon)
Overall, we’d rate this terrain five out of five stars!
(Huh, what’s that honey? Self-serving? No, I don’t think it’s self-serving just
because we designed and built the hill from scratch. Ha! What are you
thinking? *shaking head at Wife*)
Moving on…
-----------------------
The Damaged Sections
If you remember the concept from Part 1, then you know that
the setting for the table is right after the Space Marines have blown through
an outer wall and are advancing across the interior of the Dome of Tears. To make this happen, I needed sections of the
table damaged, but I did not want to permanently modify the table. So I decided
to go classic NOVA style and put the damaged sections on MDF boards.
Taking two ground-down 12” by 12” MDF bases, I started
attaching foam. In one, I decided it would be a blast crater, so I made two
angled pieces of foam and set them across from each other.

I then used my table wire cutter and shaped the foam.

Using my fingers, I pinched out sections of the sides to make
them look broken up. The idea is that the bone like material the Eldar use to
make stuff has an internal structure like real bone. Basically, it is the
damaged, broken bone of the destroyed floor.
I wanted it to remind people of bone marrow.
 |
| (Excuse this picture for jumping ahead to a state of being primed. I forgot to snap a shot of it before painting began.) |
For the second section, I decided it would be a destroyed
structure. I used foam in a similar way as the first but made it more random
and even more distressed.

I glued on pieces
left over from the laser cut terrain and added sand similar to the above,
making sure the sand went all over the place.

Here are the pieces ready for priming!

See that
section of foam at the top of the picture above with lines on it? Look familiar?
Remember how I made prototypes in Part 2 to test which finish I wanted to put
on the table? Well, that’s the piece that I said would make another appearance. I angle cut it so it sits flat on the bottom but has an angled top. Slight so models will sit on it but enough to be noticeable and interesting.
In the next part we’ll begin painting all this cool
terrain and the table they sit on.
Later RGH
No comments:
Post a Comment